Spider plant propagation is one of the easiest and most rewarding ways to expand your plant collection. With their abundant “babies” or spiderettes, these plants practically propagate themselves.
But when’s the best time to do it – and what’s the simplest method to ensure success?
Let’s go over everything you need to know to propagate your spider plant like a pro.
Table of Contents
Easy Spider Plant Care Guide 💚
⭐ Want one? Get your very own Spider Plant here
💧 Water: Water when the top inch of soil feels dry. Spider plants prefer slightly moist soil but can tolerate occasional drying out. Avoid overwatering to prevent root rot.
🌱 Soil: Use a well-draining potting mix - I personally use this potting mix - which works great, especially with added perlite for better aeration (like that one has).
☀️ Light: Bright, indirect light is ideal, but Spider plants are adaptable and can handle lower light. Avoid direct sunlight, which can cause the leaves to scorch.
🌡️ Temperature: Keep your Spider plant in a room between 65-75°F (18-24°C). They don’t like cold drafts or sudden temperature changes.
🌿 Fertilizer: Feed with a diluted, balanced fertilizer (my top pick is this Miracle-Gro one) once a month during the growing season. Hold off on fertilizing in fall and winter.
Preparing to Propagate
Proper preparation is key to successful spider plant propagation. You’ll need to choose the right time and gather a few essential supplies. This process is straightforward and can be done with minimal equipment.
When to Propagate Spider Plants
Spring and summer are ideal for propagating spider plants. These seasons provide the warm temperatures and increased sunlight that encourage growth. Your plant should be healthy and have several long runners with baby spider plant plantlets. Look for plantlets with small roots already forming – these are ready for propagation.
Avoid propagating in winter when growth slows down. If you live in a cold climate, wait until indoor temperatures are consistently above 65°F (18°C). Make sure you have a few weeks of good growing conditions ahead.
You’ll need some basic supplies:
- Small pots (2-3 inches in diameter)
- Well-draining potting soil (this is my favorite potting mix for spider plants)
- Clean, sharp scissors or pruning shears
- Water
Have these items ready before you start. This preparation will make the process smooth and increase your chances of success.
How to Propagate Spider Plants
Spider plants can be propagated in two main ways: through spiderettes and by division. Spiderettes are small plantlets that grow on long stems from the mother plant. To propagate using spiderettes, you can root them in water or soil.
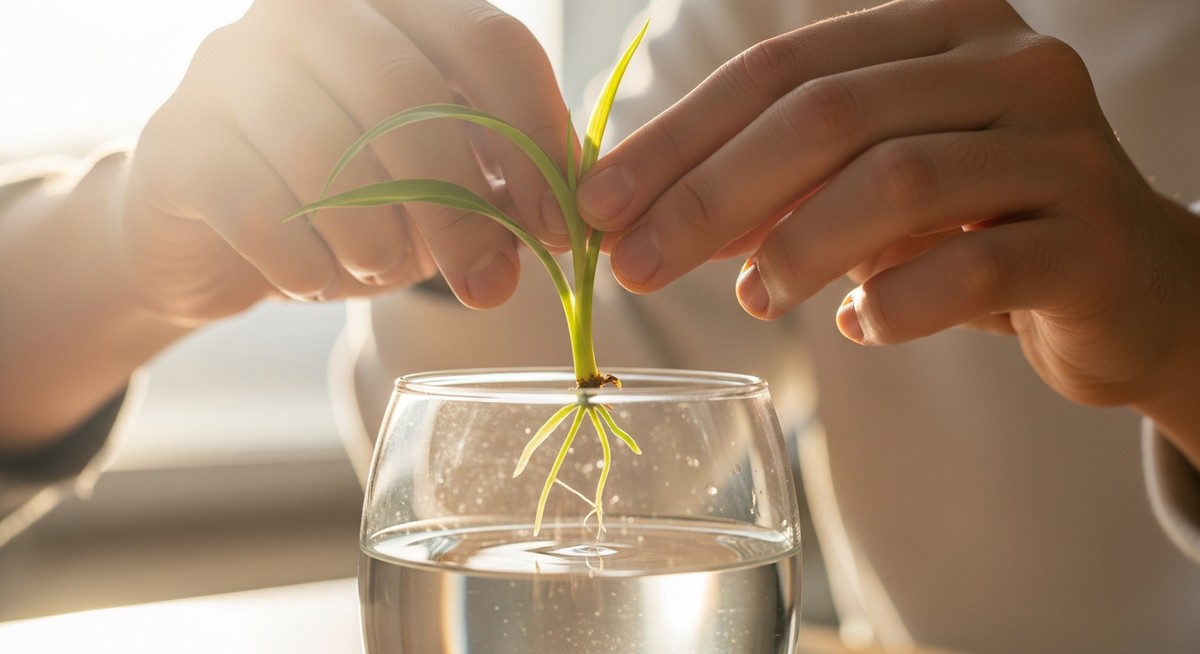
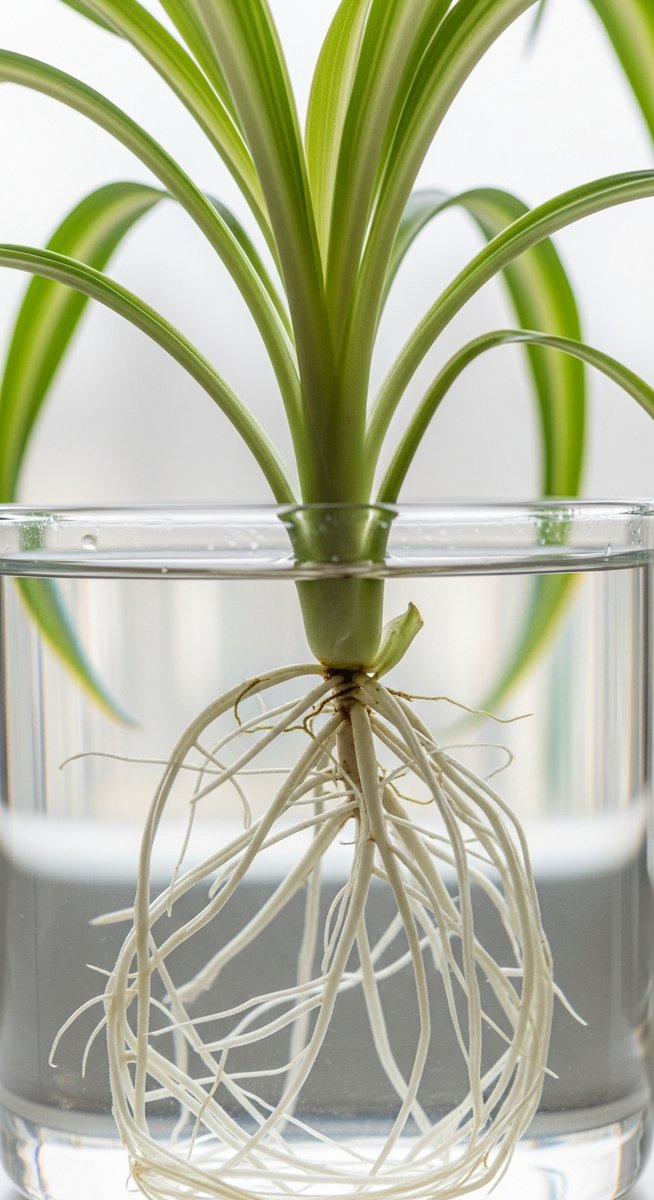
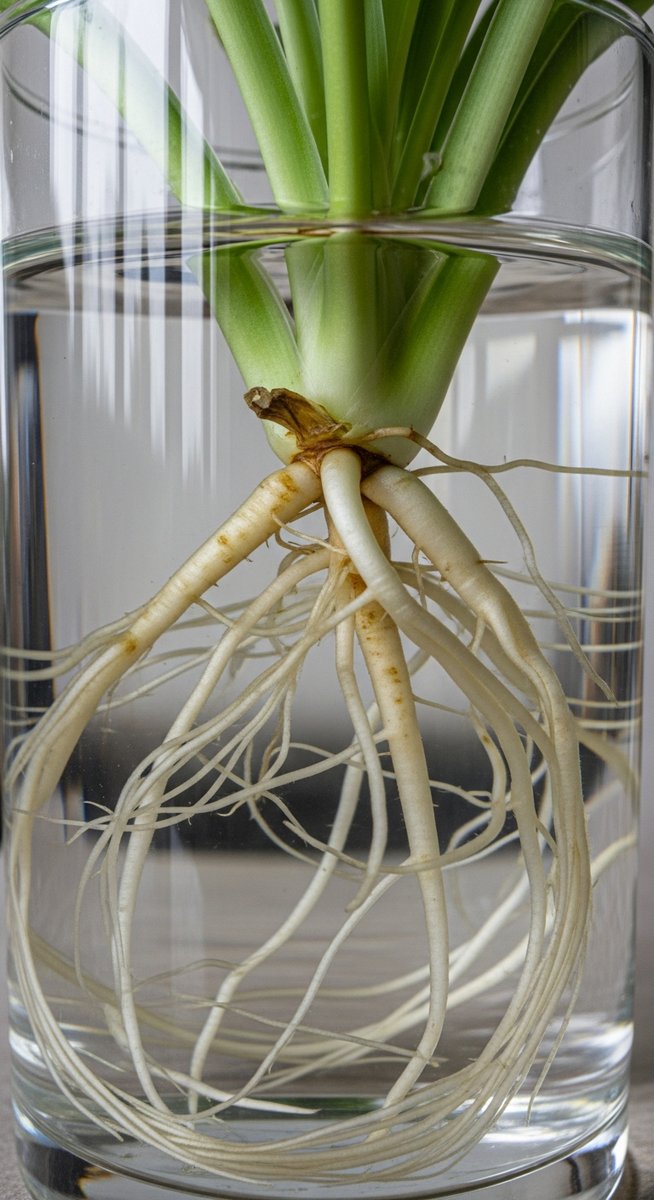
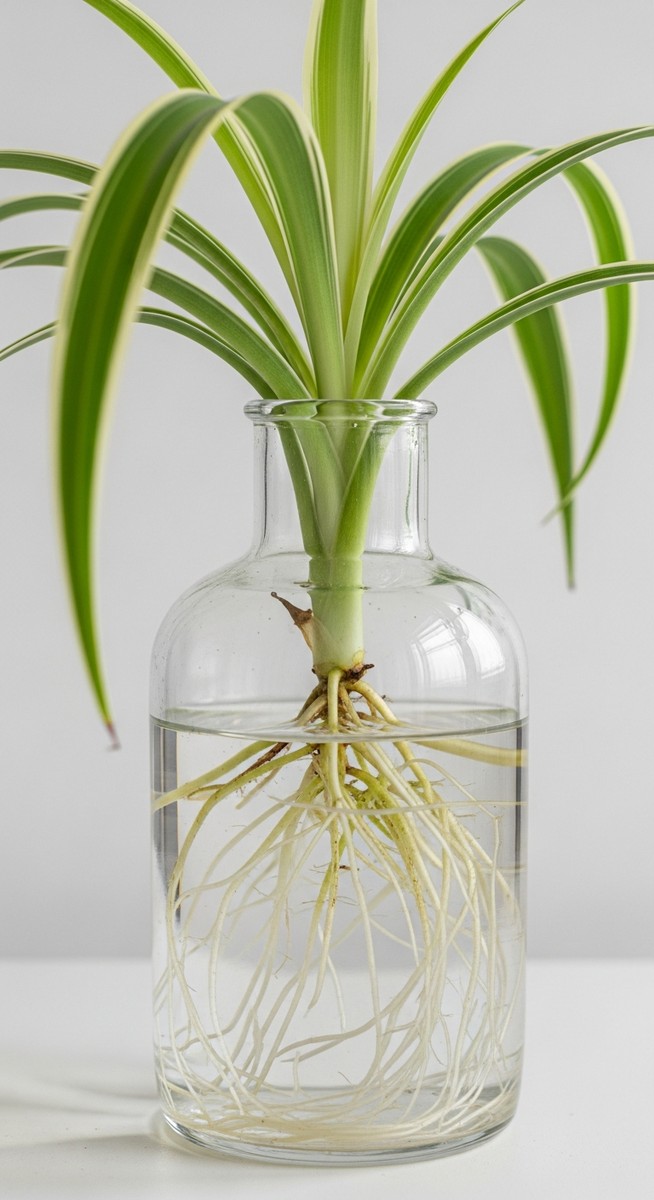
For propagating spider plants in water, place the spiderette in a glass of water, ensuring the base is submerged. Change the water every few days until roots develop. Once roots are about an inch long, plant the spiderette in soil.
Soil propagation involves planting the spiderette directly in a small pot with well-draining soil. Keep the soil moist but not waterlogged. Roots will develop in a few weeks.
Division is another effective method. Carefully remove the plant from its pot and gently separate the root ball into smaller sections. Repot each section in fresh soil.
Propagating by Offsets
Spider plants produce offsets, also called plantlets or spiderettes, which make propagation easy. These baby plants grow on long stems and can be rooted to create new plants.
The process is simple and rewarding for gardeners of all skill levels.
Identifying Plantlets Ready for Propagation
Look for plantlets with visible aerial roots and at least 2-3 small leaves. These are typically ready for propagation when they’re about 2-3 inches in size. Healthy plantlets will have a vibrant green color and firm leaves. You can leave the plantlets attached to the mother plant until roots develop, or remove them for propagation.
To remove a plantlet, use clean, sharp scissors to cut the stem close to the baby plant. This helps prevent damage and reduces the risk of disease.
If you’re propagating multiple offsets, choose ones from different stems to maintain genetic diversity in your new plants.
Rooting Spider Plantlets in Water
Fill a small glass or jar with room temperature water. Place the plantlet in the container, making sure the base and aerial roots are submerged. Keep the leaves above the water to prevent rotting. Change the water every few days to keep it fresh and prevent bacterial growth.
Place the container in a bright spot with indirect light. Avoid direct sunlight, as it can be too harsh for developing roots.
You should see new root growth within 1-2 weeks. Wait until the roots are about an inch long before transplanting to soil.
For faster rooting, you can add a small amount of rooting hormone (I use this one) to the water. This isn’t necessary but can speed up the process.
Transplanting Rooted Plantlets into Soil
Once your plantlets have developed roots, it’s time to move them to soil. Choose a well-draining potting mix suitable for indoor plants – my favorite one for spider plants is below.

Miracle-Gro Houseplant Potting Mix
⭐⭐⭐⭐⭐
The best soil for Spider Plants, designed to keep them thriving indoors. With excellent drainage and key nutrients, it promotes strong roots and vibrant, arching leaves.
Fill a small pot (about 4 inches in diameter) with the soil mix, leaving space at the top.
Make a hole in the center of the soil with your finger or a pencil. Gently place the rooted plantlet in the hole, making sure the roots are spread out.
Cover the roots with soil, pressing gently to remove air pockets. Water the soil thoroughly until it drains from the bottom of the pot.
Place your newly repotted spider plant in a spot with bright, indirect light. Keep the soil consistently moist but not waterlogged for the first few weeks as the plant establishes itself in its new home.
Propagating by Division
Spider plants can be easily divided to create new plants. This method allows you to separate mature plants with multiple crowns.
It’s a quick way to expand your collection or share plants with friends.
Separating the Mother Plant
To divide a spider plant, start by gently removing it from its pot. Shake off excess soil to expose the root system. Look for natural divisions where the plant has multiple crowns or offshoots.
Using clean, sharp scissors or a knife, cut through the roots to separate the crowns. Each division should have its own set of roots and leaves. Trim away any dead or damaged roots.
Make sure each divided section is at least 3-4 inches in diameter for the best chance of success. If your plant has many small offshoots, you can separate these individually as well.
Potting Divided Plants
Once you’ve separated the divisions, it’s time to pot them up. Choose containers with drainage holes that are slightly larger than the root ball. Fill the pots about a third full with fresh potting mix.
Place each division in its new pot, spreading out the roots. Add more soil around the roots, gently pressing down to remove air pockets. Water thoroughly until it drains from the bottom.
Keep the newly potted divisions in a warm, bright spot out of direct sunlight. Water when the top inch of soil feels dry. Your divided plants might look a bit droopy at first, but they’ll perk up in a week or two as they establish new roots.
Aftercare for Propagated Spider Plants
Caring for newly propagated Spider Plants is crucial for their success. Proper attention to their needs will help them establish strong roots and grow into healthy, vibrant plants.
You’ll want to place your newly propagated Spider Plants in bright, indirect light. Direct sunlight can scorch their leaves, so a spot near a north or east-facing window is ideal. Keep the temperature between 60-75°F (15-24°C) for best results.
Water your spider plants when the top inch of soil feels dry. Spider Plants prefer slightly moist soil but don’t like to sit in water. Use well-draining potting mix and pots with drainage holes to prevent root rot.
Humidity is important for Spider Plants. You can increase humidity by misting the leaves or placing a tray of water nearby. Aim for 40-60% humidity levels.
Fertilize your plants every 2-4 weeks during the growing season with a balanced, water-soluble fertilizer diluted to half strength. I always recommend the one below for spider plants.

Miracle-Gro Water Soluble All Purpose Plant Food
⭐⭐⭐⭐⭐
The best fertilizer for Spider Plants, boosting healthy foliage and encouraging new growth. Safe and effective for keeping your plant strong and thriving
Benefits of Propagating Spider Plants
Propagating spider plants offers several advantages. It’s a cost-effective way to increase your plant collection without buying new ones. You can fill your home with lush greenery or give plants as gifts.
Spider plant propagation is also a great way to learn about plant care and growth. It’s an ideal project for beginners, as spider plants are forgiving and easy to propagate.
By propagating, you can rejuvenate older plants and maintain their health. It helps manage plant size and prevents overcrowding in pots. You’ll also have backup plants in case the original one becomes damaged or diseased.
Propagation allows you to experiment with different growing conditions and find what works best in your home. It’s a fun and rewarding process that connects you more deeply with your plants.
Encouraging Growth in New Spider Plants
New spider plants need proper care to thrive. You’ll want to focus on providing the right nutrients, water, and maintenance to help them flourish.
Feeding and Watering Guidelines
Spider plants don’t need much fertilizer. You can feed them every 2-4 weeks during the growing season with a balanced, water-soluble fertilizer (like the one I mentioned above) diluted to half strength. Don’t fertilize in winter when growth slows down.
Water your spider plants thoroughly, then allow the top inch of soil to dry out before watering again. They prefer slightly moist soil but can tolerate short dry periods. Reduce watering in winter.
Avoid using chlorinated tap water – it can cause brown leaf tips. Let tap water sit out overnight or use rainwater instead. Spider plants like humidity, so mist leaves occasionally or place the pot on a humidity tray.
Pruning and Grooming Tips
Prune your spider plant to keep it looking neat and encourage fuller growth. Remove any yellow or brown leaves by cutting them off at the base with clean scissors. This improves the plant’s appearance and health.
Trim off long stems or “spiderettes” if you don’t want to propagate new plants. Cut them close to where they emerge from the main plant. You can also remove entire offshoots to control the plant’s size and shape.
You can even prune it to create a spider plant bonsai!
Dust the leaves gently with a damp cloth to keep them clean and able to photosynthesize efficiently. This also helps you spot any pest issues early on. Rotate the pot regularly to promote even growth on all sides.
Frequently Asked Questions
Spider plant propagation offers several easy methods to grow new plants. These common questions cover water propagation, leaf cuttings, timing, and encouraging new growth.
How do you propagate a spider plant in water?
Place a spider plant baby in a jar of water, making sure the roots are submerged. Change the water every few days to keep it fresh. Within 1-2 weeks, you’ll see new roots developing.
Once the roots are about 1-2 inches long, you can transplant the baby into soil.
Can you start a new spider plant from a leaf cutting?
Unfortunately, spider plants can’t be propagated from leaf cuttings alone. You’ll need a plantlet (baby) with some roots attached for successful propagation. These babies grow naturally on long stems called stolons.
What’s the best time or condition to snip spider plant babies for propagation?
The ideal time to snip spider plant babies is when they’ve developed small roots. This usually happens when the plantlets are about 2-3 inches in size. Spring and summer are the best seasons for propagation, as the plant is actively growing.
Is it possible to propagate a spider plant without offshoots?
While it’s not common, you can propagate a spider plant by division if it doesn’t have offshoots. Carefully remove the plant from its pot and gently separate the root ball into sections. Each section should have leaves and roots attached.
How can you encourage a spider plant to produce more babies for propagation?
To encourage more babies, ensure your spider plant gets bright, indirect light. Keep the soil slightly moist but not waterlogged. Fertilize monthly during the growing season with a balanced houseplant fertilizer. Slightly root-bound plants tend to produce more offshoots.