
Propagating your peace lily is a great way to grow your collection or share this beautiful plant with friends. While it may seem intimidating at first, peace lily propagation is actually straightforward and rewarding.
But when’s the best time to propagate – and what’s the easiest method to ensure success?
Let’s go over the steps to successfully propagate your peace lily and keep it thriving.
Table of Contents
Easy Peace Lily Care Guide 💚
⭐ Want one? Get your very own Peace Lily here!
💧 Water: Water when the top inch of soil feels dry. Peace Lilies like consistently moist soil but don’t tolerate sitting in standing water.
🌱 Soil: Use a well-draining potting mix with good moisture retention - I personally use this potting mix. A mix with peat, perlite, or coco coir, like this one, works well.
☀️ Light: Bright, indirect light is ideal for blooming, but Peace Lilies can also tolerate lower light conditions. Avoid direct sunlight, which can scorch their leaves.
🌡️ Temperature: Keep your Peace Lily in a room between 65-85°F (18-29°C). Avoid drafts, cold temperatures, and sudden temperature changes.
🌿 Fertilizer: Feed with a balanced, water-soluble fertilizer (my top pick is this Miracle-Gro one) once a month during spring and summer. Pause fertilizing in fall and winter.
When to Propagate a Peace Lily
Spring and early summer are ideal for propagating peace lilies. During these seasons, the plant is actively growing and can recover quickly from division. Avoid propagating in winter when growth slows down.
Choose a healthy, mature plant with multiple crowns. Look for natural divisions in the root system. These divisions often have their own leaves and roots.
Water your peace lily thoroughly a day before propagation. This ensures the plant is well-hydrated and makes separation easier.
Tools and Materials Needed
You’ll need clean, sharp scissors or a knife for dividing the plant. Sterilize your tools with rubbing alcohol to prevent disease spread. Gather new pots with drainage holes and fresh potting soil.
Essential items:
- Clean, sharp scissors or knife
- Rubbing alcohol
- New pots
- Fresh potting soil
- Watering can
Have a clean work surface ready. Newspaper or a tarp can help contain mess. Wear gloves to protect your hands during the process.
Prepare your new pots by filling them halfway with potting soil – my preferred one for peace lilies is below. This makes it easier to place the divided plants.

Miracle-Gro Houseplant Potting Mix
⭐⭐⭐⭐⭐
The best soil for Peace Lilies, providing the right balance of moisture retention and aeration. Made with perlite, sphagnum, and peat moss to support healthy roots while reducing the risk of gnats
How to Propagate Peace Lilies
Dividing peace lilies is a simple way to create new plants from an existing one. This method works best with mature, healthy plants that have grown too large for their current pot. It allows you to multiply your collection or share with friends.
Start by watering your peace lily a day before dividing to reduce stress. Gently remove the plant from its pot and shake off excess soil.
Look for natural divisions in the root ball – these are separate crowns with their own roots and leaves. Carefully pull these sections apart with your hands.
If they’re tightly bound, use a clean, sharp knife to cut through the roots.
Make sure each division has at least 2-3 leaves and a good chunk of roots. Trim away any damaged or dead roots.
Rinse the roots to remove old soil and check for pests or diseases. This is a good time to inspect the overall health of your plant.
Root Separation Techniques
There are two main ways to separate peace lily roots. The first is manual separation, where you gently tease apart the roots with your fingers. This works well for loosely packed root balls. Start at the outer edges and work your way in, being careful not to damage too many roots.
For more densely packed roots, you might need to use tools. A clean garden fork can help loosen the root ball. Insert it near the center and gently pry the sections apart.
If you need to cut, use sharp, sterilized pruning shears or a knife. Make clean cuts to minimize damage and reduce the risk of disease.
Potting and Aftercare for Divisions
Choose pots with drainage holes that are slightly larger than the root system of each division. Use a well-draining potting mix made for houseplants.
Place the division in the pot at the same depth it was growing before. Gently firm the soil around the roots to remove air pockets.
Water the newly potted divisions thoroughly. Place them in a spot with bright, indirect light.
Avoid direct sunlight for the first few weeks as the plants recover. Keep the soil consistently moist but not waterlogged.
You might need to mist the leaves or use a humidity tray to boost moisture levels.
Don’t fertilize your peace lily for the first month to allow the roots to establish. After that, resume regular feeding with a balanced houseplant fertilizer, like the one below which has the perfect balance for peace lilies.

Miracle-Gro Water Soluble All Purpose Plant Food
⭐⭐⭐⭐⭐
The best fertilizer for Peace Lilies, supporting bright, lush foliage and beautiful blooms. Feeds instantly to keep your plant looking its best
Be patient – it may take several weeks for your divisions to show new growth.
Growing From Seed
Peace lilies can be grown from seeds, though it’s less common than propagation through division. Seeds offer a chance to cultivate new plants with potentially unique traits. The process requires patience and careful attention to detail.
Harvesting Seeds
To harvest peace lily seeds, wait for the flower to fade and form a seed pod. The pod will turn green, then yellow, and finally brown.
Once brown and dry, gently open the pod to reveal tiny black seeds. Collect these seeds carefully – they’re quite small.
It’s best to use seeds immediately, as they lose viability quickly. If you can’t plant right away, store them in a cool, dry place for up to a week.
Germination Conditions
Peace lily seeds need specific conditions to germinate successfully. Fill a small pot with a well-draining seed starting mix. Moisten the soil and sprinkle seeds on top – don’t bury them, as they need light to germinate.
Cover the pot with clear plastic to maintain humidity. Place in bright, indirect light and keep the temperature between 70-80°F (21-27°C).
Mist regularly to keep the soil moist but not waterlogged. Germination typically occurs within 2-3 weeks.
Seedling Care
Once seedlings emerge, remove the plastic cover. Keep the soil consistently moist but not soggy.
Provide bright, indirect light – direct sun can scorch young plants. When seedlings have 2-3 leaves, carefully transplant them into individual pots filled with a well-draining potting mix.
Water gently and place in a warm, humid spot with indirect light. Gradually acclimate them to normal room conditions over a few weeks.
Feed with a diluted, balanced fertilizer every 4-6 weeks during the growing season.
Troubleshooting Common Issues
Peace lilies are generally easy to care for, but they can face a few challenges. Identifying and addressing problems early is key to keeping your plant healthy and thriving.
Pest Problems
Mealybugs and spider mites are common pests that can attack peace lilies. You’ll spot mealybugs as small white, cottony clusters on leaves and stems. Spider mites create fine webs between leaves and cause yellowing.
How to Get Rid of Pests on Your Houseplants
If you notice pests on your indoor plants, follow these steps to tackle the problem before it gets worse:
- Start with manual removal – For minor infestations, wipe leaves with a cotton swab dipped in rubbing alcohol or rinse the plant under lukewarm water to remove pests by hand.
- Use neem oil or insecticidal soap – If pests persist, treat your plant with neem oil or insecticidal soap (those are my preferred ones!), both of which target common houseplant pests without harming your plant.
- Apply a houseplant-safe pesticide – For severe cases that don’t respond to other treatments, use a broad-spectrum pesticide designed for indoor plants to eliminate stubborn pests – I use this pesticide for tough infestations.
By acting quickly and using the right treatments, you can keep your houseplants pest-free and thriving!
Regular inspection helps catch pest issues early before they spread.
Disease Management
Root rot is a frequent problem for peace lilies, often caused by overwatering. Signs include yellowing leaves, wilting, and a foul smell from the soil.
To manage root rot:
- Remove the plant from its pot
- Cut away brown, mushy roots
- Repot your peace lily in fresh, well-draining soil
Leaf spot diseases can also occur, showing as brown or black spots on leaves. Remove affected leaves and avoid wetting the foliage when watering to prevent spread.
Addressing Environmental Stress
Browning leaf tips often indicate low humidity or overexposure to direct sunlight. Move your plant to a shadier spot and increase humidity by misting or using a pebble tray.
Yellowing leaves can mean too much light for your peace lily or improper watering. Check soil moisture – it should be consistently moist but not waterlogged. Adjust your watering schedule as needed.
Drooping leaves usually signal underwatering. Give your plant a good soak, but make sure the pot has drainage holes to prevent waterlogging.
Frequently Asked Questions
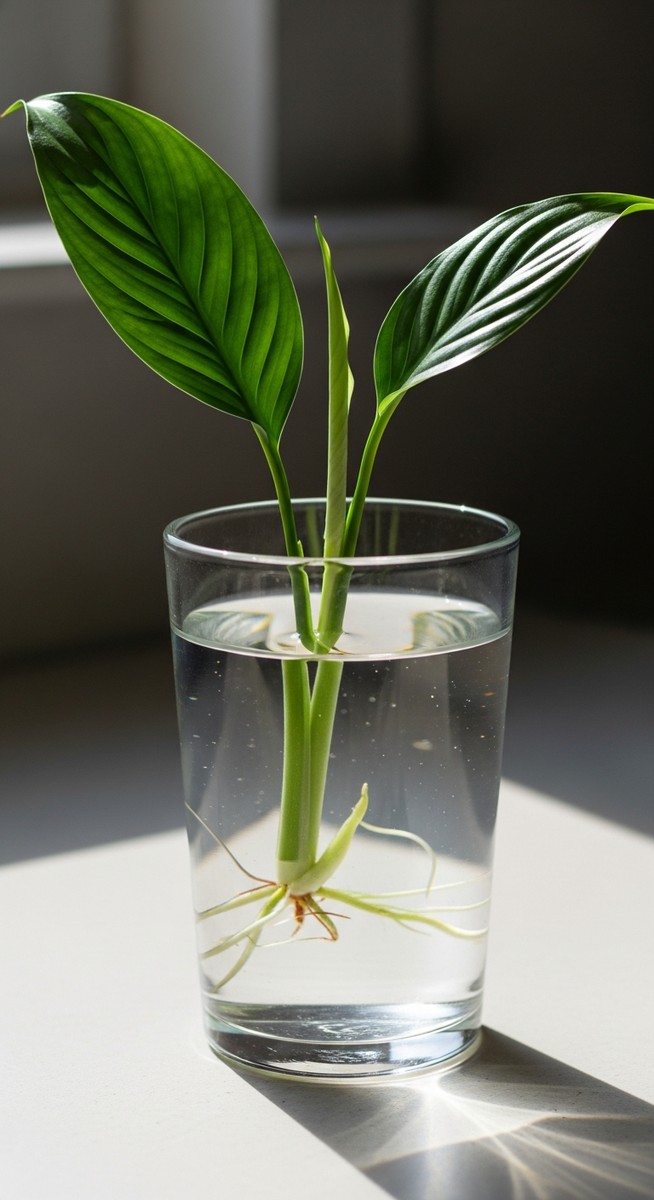
How can I propagate a peace lily using water?
To propagate a peace lily in water, start by gently dividing the plant and selecting a healthy stem with leaves. Cut the stem at a 45-degree angle and place it in a clear container filled with room temperature water. Change the water every few days to keep it fresh.
Within 2-4 weeks, you’ll see roots forming. Once the roots are about 2-3 inches long, you can transplant the cutting into soil.
Is it possible to grow a new peace lily plant from seeds?
Growing peace lilies from seeds is possible but uncommon. Peace lily seeds are rarely available commercially. If you have access to seeds, plant them in a moist, well-draining potting mix.
Keep the soil warm and humid. Germination can take several weeks. Once seedlings appear, care for them as you would mature plants.
While it’s definitely possible to do this, keep in mind that this method takes longer than division or stem cuttings.
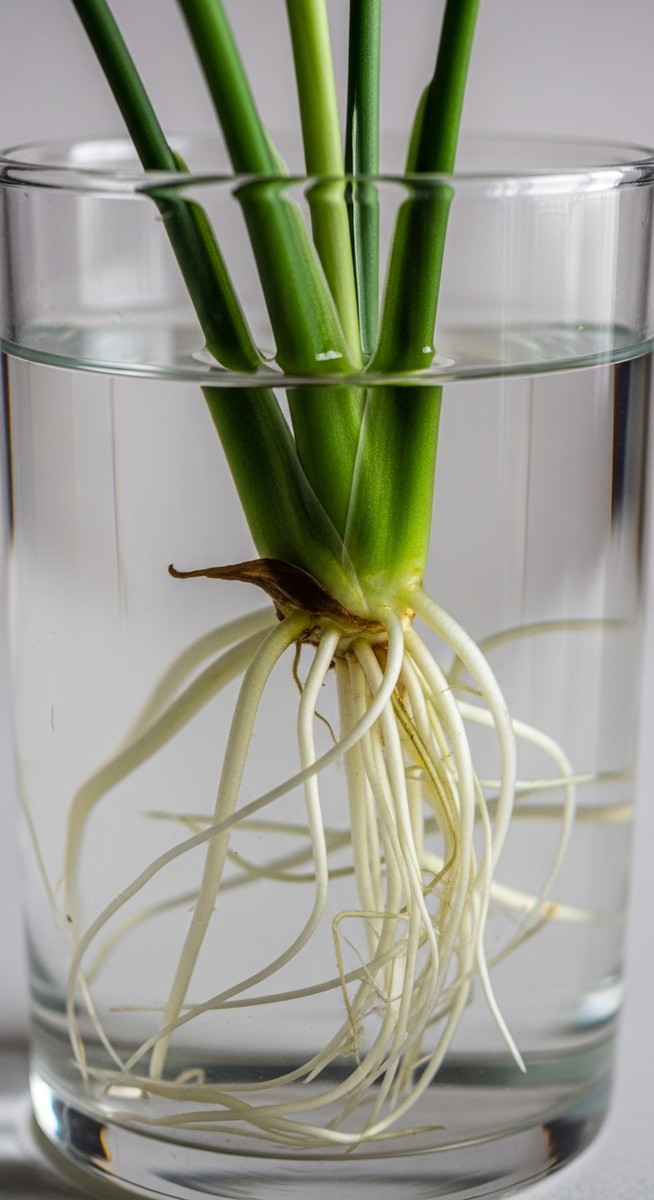
Can you root a peace lily in water and how long does it take?
Yes, you can root a peace lily in water. The process typically takes 2-4 weeks. Place the cutting in a clear container with clean water, ensuring the cut end is submerged. Keep the container in a warm, bright spot but out of direct sunlight.
You’ll see roots developing within a few weeks. Once the roots are 2-3 inches long, the cutting is ready for potting.
What’s the best environment for propagating peace lilies – water or soil?
Both water and soil can be effective for propagating peace lilies. Water propagation allows you to monitor root growth easily. Soil propagation more closely mimics the plant’s natural growing conditions.
For beginners, water propagation might be easier. For experienced gardeners, soil propagation can lead to stronger root systems. Choose based on your comfort level and available resources.
Are there any special care tips for peace lilies during the propagation process?
During propagation, keep your peace lily cuttings in a warm, humid environment. Avoid direct sunlight, which can stress the young plants. For water propagation, change the water regularly to prevent bacterial growth. In soil, maintain consistent moisture without overwatering.
Be patient – root development takes time. Once roots form, gradually introduce the new plants to brighter light and fertilize lightly only after the plants are established in their new pots.