Repotting a peace lily is an important part of keeping this beautiful plant healthy and thriving. Over time, peace lilies can outgrow their pots, leading to cramped roots and slower growth.
But how do you know when it’s time to repot – and what’s the best way to do it without stressing the plant?
Let’s walk through the steps to successfully repot your peace lily and help it flourish.
Table of Contents
Easy Peace Lily Care Guide 💚
⭐ Want one? Get your very own Peace Lily here!
💧 Water: Water when the top inch of soil feels dry. Peace Lilies like consistently moist soil but don’t tolerate sitting in standing water.
🌱 Soil: Use a well-draining potting mix with good moisture retention - I personally use this potting mix. A mix with peat, perlite, or coco coir, like this one, works well.
☀️ Light: Bright, indirect light is ideal for blooming, but Peace Lilies can also tolerate lower light conditions. Avoid direct sunlight, which can scorch their leaves.
🌡️ Temperature: Keep your Peace Lily in a room between 65-85°F (18-29°C). Avoid drafts, cold temperatures, and sudden temperature changes.
🌿 Fertilizer: Feed with a balanced, water-soluble fertilizer (my top pick is this Miracle-Gro one) once a month during spring and summer. Pause fertilizing in fall and winter.
Signs Your Peace Lily Needs Repotting
Peace lilies often signal when they need more space. Watch for roots peeking out of drainage holes, slowed growth, and compacted soil. These indicators suggest it’s time to give your plant a new home.
Roots Emerging from Drainage Holes
When roots start poking out of the bottom of your pot, it’s a clear sign your peace lily needs more room. This happens because the plant has outgrown its current container.
You might notice roots circling the bottom of the pot or coming out of drainage holes. It’s time to act fast – these exposed roots can dry out and damage your plant.
Healthy roots should be white or light tan. If you see dark or mushy roots, trim them off before repotting.
Choose a new pot that’s 1-2 inches larger in diameter. This gives your peace lily space to grow without overwhelming it with too much soil.
Slowed Growth or Yellowing Leaves
Your peace lily might be telling you it needs a bigger home if its growth slows down or stops. Look for smaller new leaves or a lack of new growth altogether.
Yellowing leaves can also be a sign, especially if they’re not due to overwatering or light issues with your peace lily.
When a plant becomes rootbound, it can’t take up nutrients efficiently. This leads to stunted growth and discoloration.
Check if your peace lily is drinking water faster than usual – this often means the roots have filled the pot, leaving little room for soil to hold moisture.
If you notice these signs, it’s best to repot sooner rather than later. Your plant will thank you with renewed vigor and lush, green foliage.
Compacted Soil Structure
Feel the soil in your peace lily’s pot. If it’s hard and doesn’t absorb water easily, it’s likely compacted.
This happens over time as soil breaks down and settles. Compacted soil doesn’t allow for proper air circulation or water drainage, which can harm your plant’s roots.
You might notice water sitting on top of the soil instead of soaking in. This is a red flag that repotting is needed.
Gently remove your peace lily from its pot and check the root ball. If it’s dense and tightly packed, it’s definitely time for a new home.
When repotting, use fresh, well-draining potting mix, with just the right balance for this plant (like my preferred one below). This will give your peace lily the nutrients and structure it needs to thrive.

Miracle-Gro Houseplant Potting Mix
⭐⭐⭐⭐⭐
The best soil for Peace Lilies, providing the right balance of moisture retention and aeration. Made with perlite, sphagnum, and peat moss to support healthy roots while reducing the risk of gnats
Break up any compacted roots before placing the plant in its new pot to encourage healthy growth.
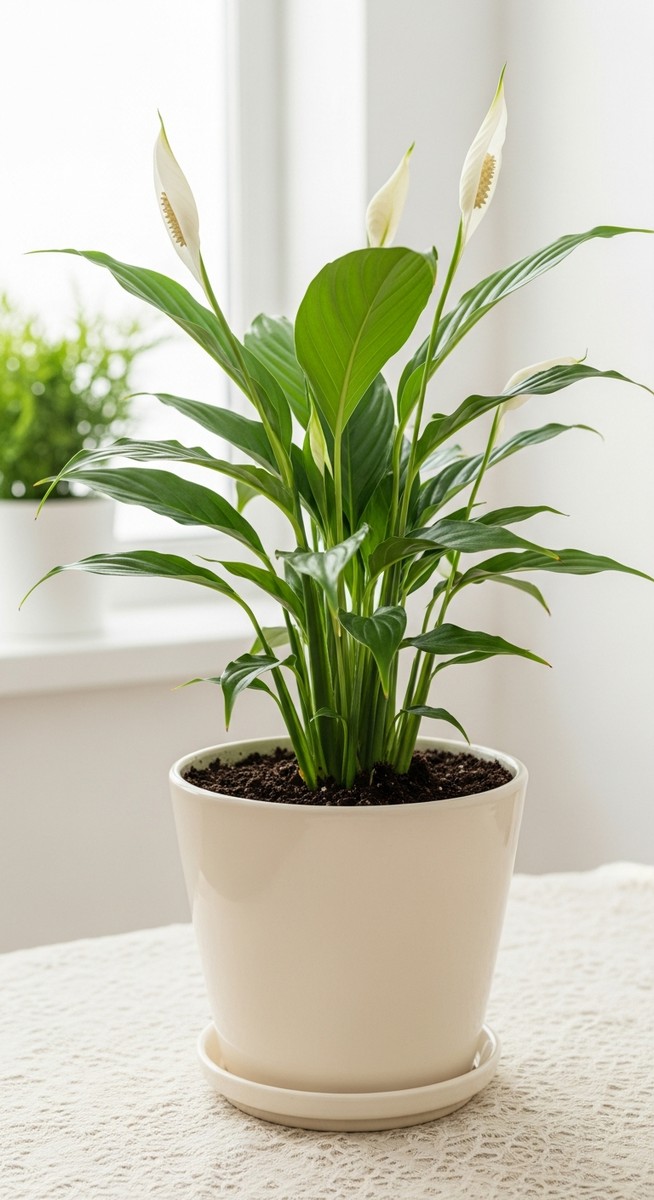
Best Pot for Peace Lilies
Terracotta pots are a popular choice for peace lilies. They’re porous, allowing air and moisture to flow through easily. This can help prevent overwatering and root rot.
Plastic pots are another option. They’re lightweight and retain moisture well, which can be beneficial if you tend to forget watering.
Ceramic pots offer a stylish look but can be heavy. They’re great for larger peace lilies that need extra stability. Whichever material you choose, make sure it has drainage holes at the bottom.
Size and Drainage Requirements
Pick a pot that’s about 2 inches larger in diameter than your peace lily’s current container. This gives the roots room to grow without overwhelming the plant. Too large a pot can lead to overwatering and poor growth.
Ensure your chosen pot has adequate drainage holes. Peace lilies don’t like sitting in water, so good drainage is essential.
If you’re using a decorative pot without holes, place a plastic liner with drainage inside it. This allows excess water to escape and prevents root rot.
Remember to empty any water that collects in the saucer beneath your pot after watering. Your peace lily will thrive in a well-chosen container with proper drainage.
Best Soil for Peace Lilies
Peace lilies thrive in a well-draining, nutrient-rich potting mix, like this Miracle-Gro potting mix which is perfect for this plant. Alternatively, if you choose to make your own mix, you’ll want to use a blend of peat moss, perlite, and organic matter.
A good ratio is 2 parts peat moss, 1 part perlite, and 1 part compost or well-rotted manure. This combination retains moisture while allowing excess water to drain.

You can also add small amounts of bark chips or coconut coir to improve aeration. For an extra boost, mix in a slow-release fertilizer at planting time, like my ideal one below. This will provide your peace lily with nutrients for several months.

Miracle-Gro Water Soluble All Purpose Plant Food
⭐⭐⭐⭐⭐
The best fertilizer for Peace Lilies, supporting bright, lush foliage and beautiful blooms. Feeds instantly to keep your plant looking its best
Remember to avoid heavy soils like straight garden soil or clay. These can lead to waterlogging and root rot.
Importance of Good Drainage
Good drainage is vital for peace lilies to prevent root rot and other moisture-related issues. You’ll need to ensure that excess water can easily escape the pot.
This is exactly why I always say that you need to choose a container with drainage holes at the bottom – this is non-negotiable for peace lilies.
Adding a layer of small stones or gravel at the bottom of the pot can improve drainage. This creates a space for water to collect away from the roots.
You can also mix in extra perlite or coarse sand to your potting mix if you’re concerned about drainage.
Don’t forget to empty the saucer under your pot after watering. Standing water can lead to root problems and attract pests.
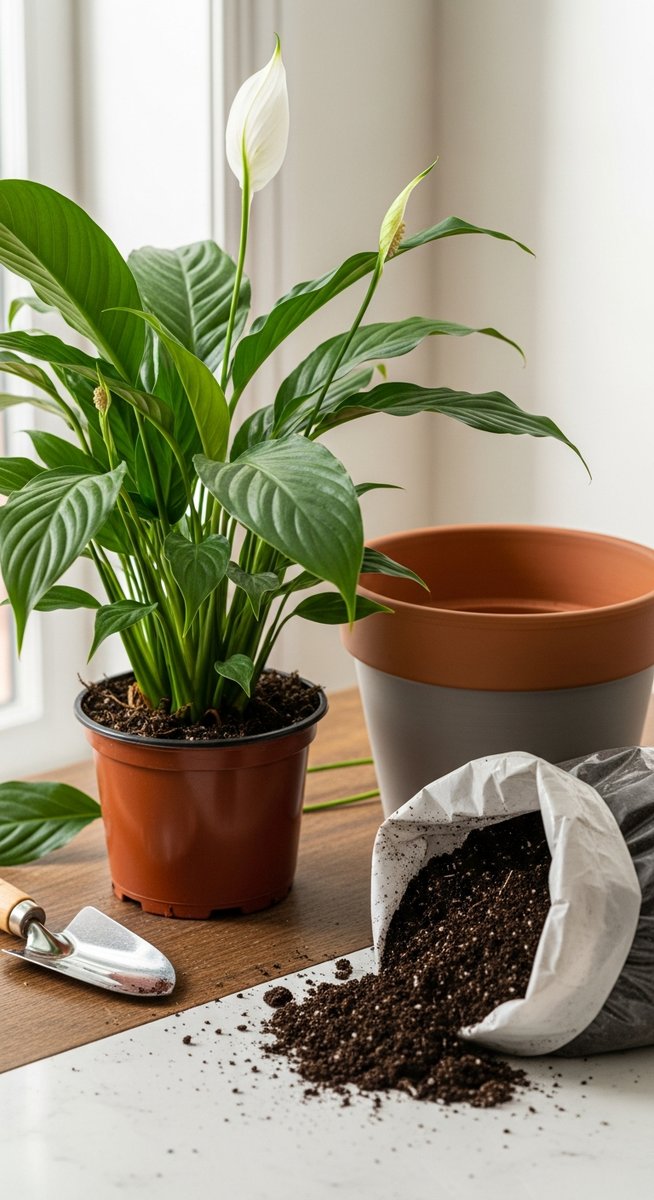
How to Repot Your Peace Lily
Repotting a peace lily refreshes its soil and gives its roots room to grow. This process helps maintain plant health and encourages new growth. Follow these steps to successfully repot your peace lily.
Preparing the Work Area
Get your supplies ready before starting. You’ll need a new pot 1-2 inches larger than the current one, fresh potting soil, and clean gardening tools.
Cover your work surface with newspaper or a tarp for easy cleanup. Fill the new pot with a layer of moist potting mix, leaving space for the plant’s root ball.
Gather gloves, a trowel, and pruning shears. Have a watering can nearby to moisten the soil if needed.
Choose a well-draining potting mix specifically for indoor plants. This ensures proper moisture retention and aeration for your peace lily’s roots.
Gentle Removal from the Current Pot
Water your peace lily a day before repotting to make removal easier. Gently squeeze the sides of the current pot to loosen the root ball.
Tilt the pot and carefully slide out the plant, supporting the base with your hand. If it’s stuck, tap the pot’s edges or run a knife around the inside to free it.
Be patient and avoid pulling on the stems or leaves. If the plant won’t budge, you might need to cut the pot away as a last resort.
Once removed, gently shake off excess soil to expose the roots.
Root Pruning and Inspection
Examine the roots closely. Healthy roots are white or light tan and firm.
Cut away any dark, mushy, or foul-smelling roots with clean, sharp scissors. Trim long roots to encourage new growth. If the roots are tightly wound, gently tease them apart with your fingers.
Remove no more than 1/3 of the root mass. This prevents shock and allows the plant to recover quickly. If you see any pests, treat the roots with an appropriate solution before repotting.
Planting in the New Pot
Place your peace lily in the new pot, ensuring it sits at the same depth as before. The top of the root ball should be about an inch below the pot’s rim.
Add fresh potting mix around the roots, gently pressing to remove air pockets. Don’t pack the soil too tightly – roots need some space to grow.
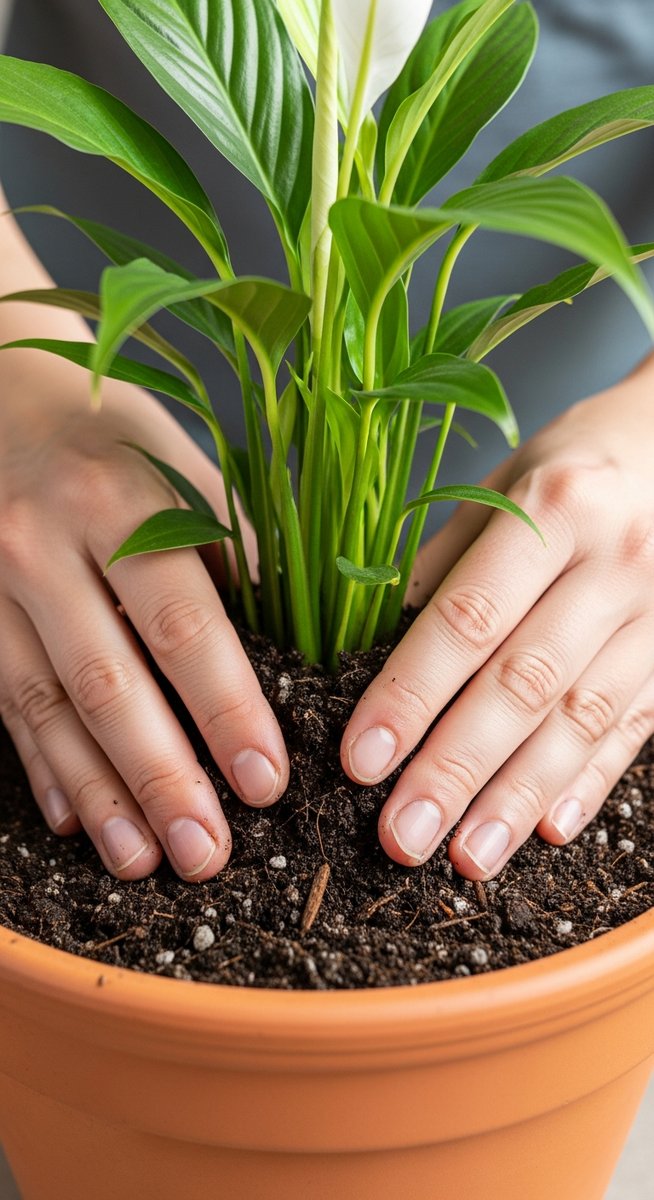
Leave some room at the top for watering. Add a slow-release fertilizer if desired, following package instructions.
Water thoroughly until it drains from the bottom holes. This settles the soil and hydrates the roots.
Post-Repotting Care
It’s important to take into account all of the various care tips for your peace lily so it acclimates well to its new home.
This includes that you should place your newly repotted peace lily in a spot with bright, indirect light. Avoid direct sunlight, which can stress the plant.
Don’t fertilize your peace lily for about a month to allow the roots to establish. Water when the top inch of soil feels dry, but don’t let it get soggy.
Keep an eye on your plant for signs of stress like drooping leaves. It’s normal for peace lilies to look a bit sad for a week or two after repotting.
Mist the leaves to increase humidity and help the plant adjust. With proper care, your peace lily will soon perk up and thrive in its new home.
Watering After Repotting
Water your Peace Lily thoroughly right after repotting. This helps settle the soil and removes air pockets.
For the next 2-3 weeks, water less frequently than usual. Check the top inch of soil – if it’s dry, it’s time to water.
As roots establish in the new pot, gradually increase watering. Use room temperature water to avoid shocking the plant.
Water until it drains from the bottom, but don’t let the pot sit in standing water.
A good rule of thumb is to water when the top 1-2 inches of soil feel dry. This usually means watering once every 5-7 days, but it can vary based on your home’s conditions.
Recognizing Overwatering and Underwatering Signs
Peace Lilies will tell you if they’re getting too much or too little water. Overwatering causes yellowing leaves, wilting, and soggy soil. The plant might develop root rot if left in waterlogged conditions.
Underwatering leads to drooping, brown leaf tips, and dry, crispy edges. The soil will feel very dry and may pull away from the sides of the pot. Your Peace Lily will perk up quickly after a good drink if it’s just slightly underwatered.
Watch for these signs and adjust your watering as needed. It’s better to underwater slightly than to overwater. If you’re unsure, wait an extra day before watering.
Fertilizing Post-Repotting
Wait about 4-6 weeks after repotting before fertilizing your peace lily. This allows the plant to settle into its new soil. Use a balanced, water-soluble fertilizer diluted to half strength. Apply it monthly during the growing season (spring and summer).
Don’t overfeed your peace lily – too much fertilizer can harm the roots. If you notice brown leaf tips, reduce fertilizing frequency.
In fall and winter, cut back to fertilizing every 6-8 weeks or stop completely if growth slows significantly.
Organic fertilizers like compost tea or worm castings are gentler alternatives. They provide nutrients more slowly, reducing the risk of burning the roots.
Monitoring for Pests and Diseases
Check your peace lily regularly for signs of pests or diseases. Common issues include:
- Spider mites: Tiny specks on leaves, fine webbing
- Mealybugs: White, cottony clusters on stems and leaves
- Root rot: Yellowing leaves, mushy stems, foul odor from soil
Inspect both sides of leaves and the soil surface weekly. If you spot pests, it’s important to take action as quickly as possible.
How to Get Rid of Pests on Your Houseplants
If you notice pests on your indoor plants, follow these steps to tackle the problem before it gets worse:
- Start with manual removal – For minor infestations, wipe leaves with a cotton swab dipped in rubbing alcohol or rinse the plant under lukewarm water to remove pests by hand.
- Use neem oil or insecticidal soap – If pests persist, treat your plant with neem oil or insecticidal soap (those are my preferred ones!), both of which target common houseplant pests without harming your plant.
- Apply a houseplant-safe pesticide – For severe cases that don’t respond to other treatments, use a broad-spectrum pesticide designed for indoor plants to eliminate stubborn pests – I use this pesticide for tough infestations.
By acting quickly and using the right treatments, you can keep your houseplants pest-free and thriving!
To prevent fungal diseases, avoid overwatering and ensure good air circulation. If you notice signs of root rot, remove the plant from its pot, trim away affected roots, and repot in fresh, well-draining soil.
Frequently Asked Questions
Repotting peace lilies can be tricky, but with the right approach, you can ensure your plant thrives in its new home. Let’s address some common concerns and provide practical tips for successful repotting.
How do you repot a peace lily without killing it?
You can repot a peace lily safely by being gentle and following a few key steps. First, water the plant a day before repotting to make removal easier. Carefully slide the plant out of its current pot, loosening the roots gently.
Place it in a new pot with fresh, well-draining soil mix. Don’t plant it too deep – keep the soil line at the same level as before.
Water thoroughly after repotting and place the plant in a shaded spot for a few days. This helps reduce stress and allows the peace lily to adjust to its new home.
Can you repot a peace lily during its flowering period?
It’s best to avoid repotting a peace lily while it’s flowering. The plant is using a lot of energy to produce blooms, and repotting can cause unnecessary stress. Wait until the flowering period is over before repotting.
If you must repot during flowering, be extra gentle and try to disturb the roots as little as possible. You might lose some flowers in the process, but the plant should recover if handled with care.
How do you divide a peace lily when repotting?
Dividing a peace lily is a great way to propagate new plants. Start by removing the entire plant from its pot. Gently separate the root ball into smaller sections, each with several healthy leaves and roots.
Use a clean, sharp knife to cut through any tangled roots if needed. Plant each division in its own pot with fresh soil.

Water well and keep the newly divided plants in a shaded area for a few days to recover.
What are common problems encountered when repotting peace lilies?
Root damage is a frequent issue when repotting peace lilies. Be careful not to tear or break too many roots during the process. Overwatering after repotting can lead to root rot, so ensure proper drainage in the new pot.
Leaf drooping is normal after repotting and usually resolves within a few days. If drooping persists, check for signs of overwatering or underwatering.
Yellowing leaves might indicate nutrient deficiency or shock – give your plant time to adjust before fertilizing.
How can you prevent shock in peace lilies after repotting?
To minimize shock, keep your peace lily’s environment consistent after repotting. Place it in a spot with similar light conditions to its previous location. Maintain consistent watering, but don’t overdo it – the new soil might retain moisture differently.
Avoid fertilizing for at least a month after repotting to prevent burning the roots. Mist the leaves regularly to increase humidity and reduce stress.
With proper care, your peace lily should bounce back and thrive in its new pot within a few weeks.