There’s no question that Monsteras are some of the most popular houseplants around these days. However, some varieties of the Swiss Cheese plant come with a hefty price tag of hundreds (and even thousands) of dollars depending on the variety.
It’s for that reason that many Monstera lovers resort to learning how to propagate Monstera plants at home themselves to increase their collection without breaking the bank.
Fortunately, the procedure is fairly straightforward and isn’t difficult to do, nor does it take long for a Monstera to propagate. Here’s just how to do it yourself!
Table of Contents
Easy Monstera Care Guide 🌿
⭐ Want one? Grab a classic Monstera here or a smaller Monstera Adansonii here!
💧 Water: Water when the top 2-3 inches of soil feel dry. Monsteras prefer consistent moisture but don’t like sitting in soggy soil.
🌱 Soil: Use a well-draining potting mix - I personally use this tropical potting mix. A mix with peat, perlite, or coco coir is great for avoiding soggy roots.
☀️ Light: Bright, indirect light is ideal. Direct sunlight can scorch their leaves, while low light may slow growth.
🌡️ Temperature: Monsteras thrive between 65-85°F (18-29°C). Keep them away from drafts and sudden temperature changes.
🌿 Fertilizer: Feed with a balanced, water-soluble fertilizer (my top pick is this Miracle-Gro one) once a month during spring and summer. Skip feeding in fall and winter.
How to propagate Monstera
Monstera plants are propagated via stem cuttings. Monstera stem cuttings can be rooted in a vase or jar of water on the windowsill or rooted in soil or perlite. Once they form roots, they can then be potted in a permanent plant pot and grown in your home.
Because the stem already contains all the genetic material of the mother plant, propagating your Monstera cutting will produce a new plant identical to the mother plant.
Keep in mind that the best times to propagate Monstera plants are in the spring and summer when they begin actively growing after a long winter’s rest. However, you can propagate your Monstera plant at any time if you trim it back and have cuttings to root.
Cuttings taken in the fall and winter may take longer to root as the plant is not actively growing at the time.
Where do I cut Monstera for propagation?
To prepare for propagation, cut your Monstera’s stem between ¼ and ½ an inch below a node, taking a four- to six-inch stem with two to three healthy leaves attached. You need to cut on an internode (the area between nodes) as your cutting needs at least one node to root.
That is, the stems of your Monstera plants are made up of both nodes and internodes. The internode is smooth and cannot produce new growth. Nodes, however, are the area on the stem where new growth originates.
Leaves, branches, and roots all grow from the node. The node is thickened and may form a bumpy ring around the stem. It may also have one or more aerial roots growing from the node.
The reason for having two to three healthy leaves on your cutting to propagate a Monstera is because this helps the cutting to grow. Specifically, having leaves allows the cutting to produce more energy and, in turn, helps it grow faster. It also gives you some room for a mistake, in that even if something goes wrong and you lose a leaf (and thus a node), there are still others to help your Monstera cutting prevail.
Related: Can You Propagate Monstera Without a Node?
How to cut Monstera for propagation
You will need a sharp knife or pruners to make a cutting for propagating your Monstera plant. Here’s how to do it.
- Locate a node on your Monstera’s stem. Don’t worry if the node has aerial roots already as these will form roots, too.
- Make a clean cut ¼ to ½ inch below the node with a clean sharp knife or pruners. It is important to sterilize the knife or pruners both before and after taking cuttings from your Monstera plant as diseases can be spread from unsterilized utensils.
- Use care not to crush or damage the stem.
How do you cut a Monstera stem?
To cut a Monstera stem, ensure that your cutting tools are sharp, so they make a clean cut. Avoid crushing or damaging the stem when you make the cut. You should also be careful where you cut the stem, to ensure you have a node in order to successfully propagate your Monstera plant.
Monstera stems are generally sturdy and are easy to cut, with the process of cutting a Monstera being relatively easy, but that doesn’t mean you shouldn’t be careful in terms of how you cut it. Where you cut it is also important as, without the node, your Monstera cutting will not grow into a new plant.
How do you root a Monstera cutting?
You root a Monstera cutting by ensuring the stem is cut below a node then placing it either in water or soil for several weeks, with at least one node being submerged or buried, as applicable. In the case of cuttings rooted in water, once roots form on the cutting, you can transplant it to a pot.
Whether you choose to root your Monstera cuttings in either a glass or vase of water or in soil or other potting media is up to you. Either method has both advantages and disadvantages, but all are fairly simple. Essentially, choose the rooting method you feel comfortable with when propagating your Monstera cuttings.
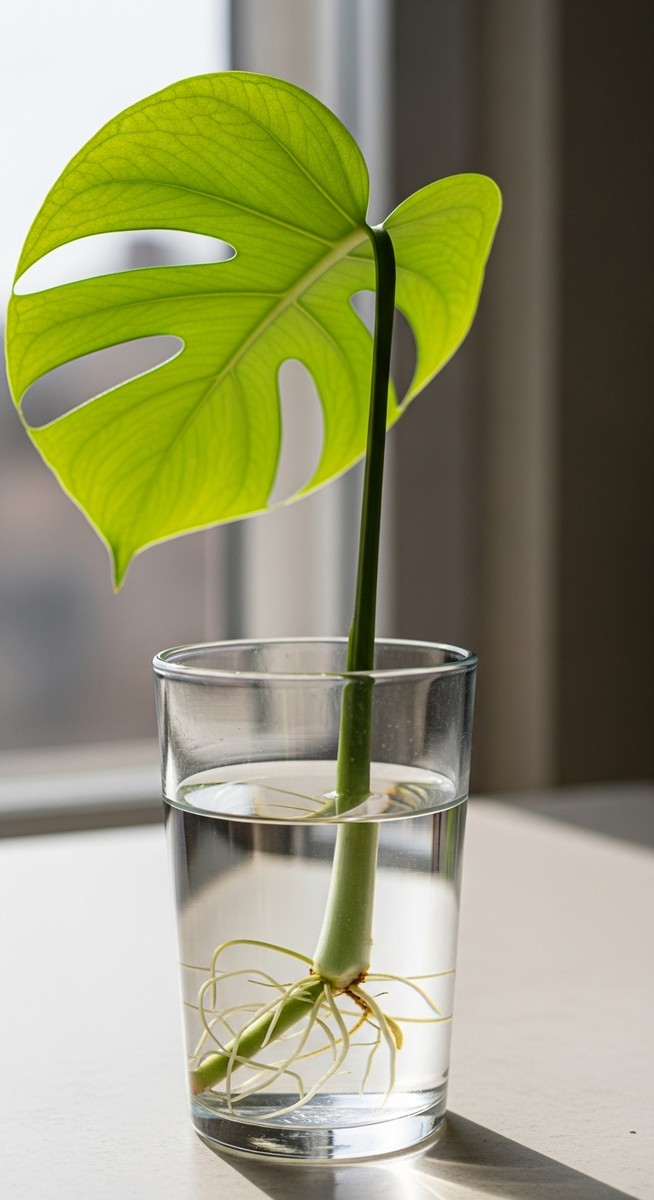
How to water propagate Monstera
- Cut a 4- to 6-inch section of the Monstera stem ¼ to ½ inch below a node. Aim for a cutting with two to three leaves. Remove any excess leaves. The leaves perform photosynthesis and provide the cutting with the energy it needs to grow.
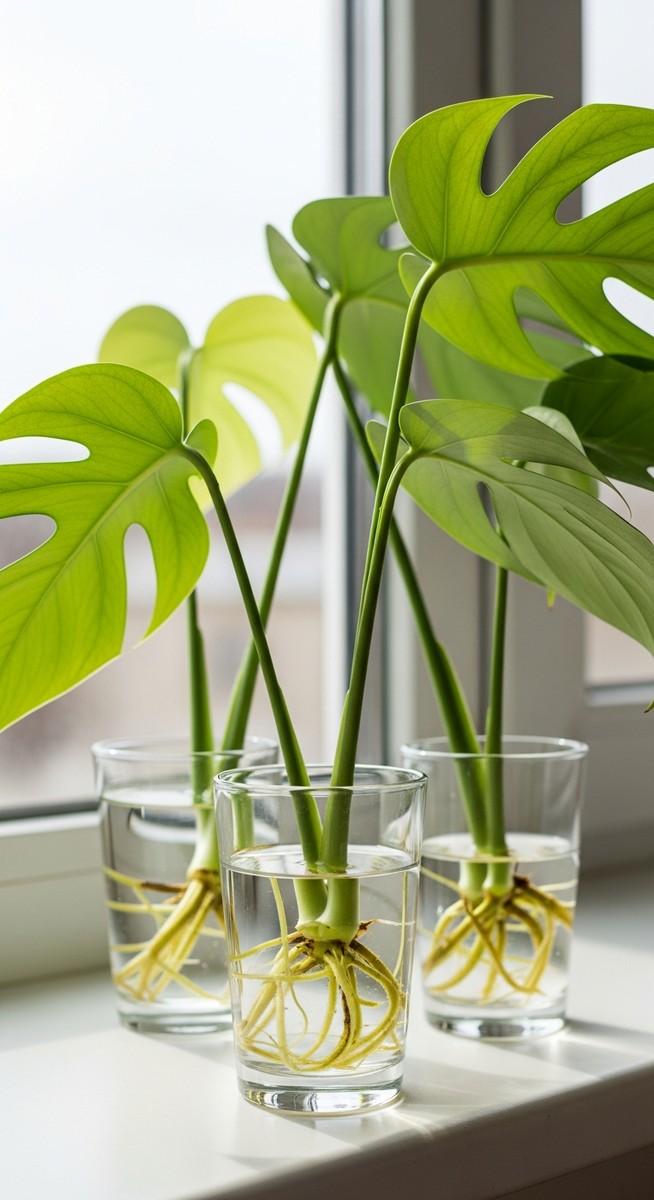
- Choose a clear container large enough to hold several cuttings. A large vase or jar is fine. Although it isn’t absolutely necessary the jar is clear, a clear container makes it easier to observe the roots.
- Fill the jar or vase with distilled or filtered water. If you must use tap water, allow the water to sit out overnight to let chlorine and other chemicals dissipate.
- Place the cutting in the water so that the node is submerged. If there are aerials roots attached, they should be under the water, too.
- Place the vase on a sunny windowsill.
- Change the water every 3 to 4 days or whenever it looks discolored or cloudy. This helps to keep the stems and developing roots aerated.
- Watch for new roots to appear in 2 to 3 weeks.
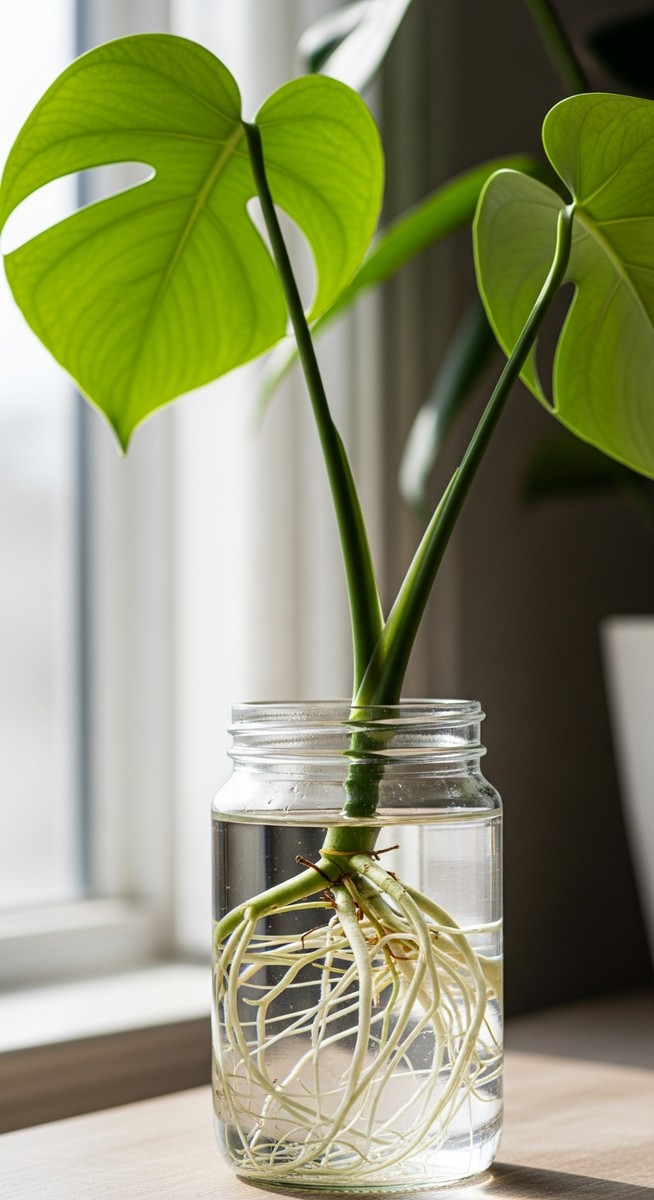
Note that it’s best to use a shallow vase or jar as the primary root that forms will continue to grow until it reaches the bottom of the jar. It will then send out secondary roots necessary for supporting the plant.
You can identify these on the basis that the primary root is typically thick and white, while secondary roots are finer and appear fuzzy or hairy.
Should I propagate Monstera in water?
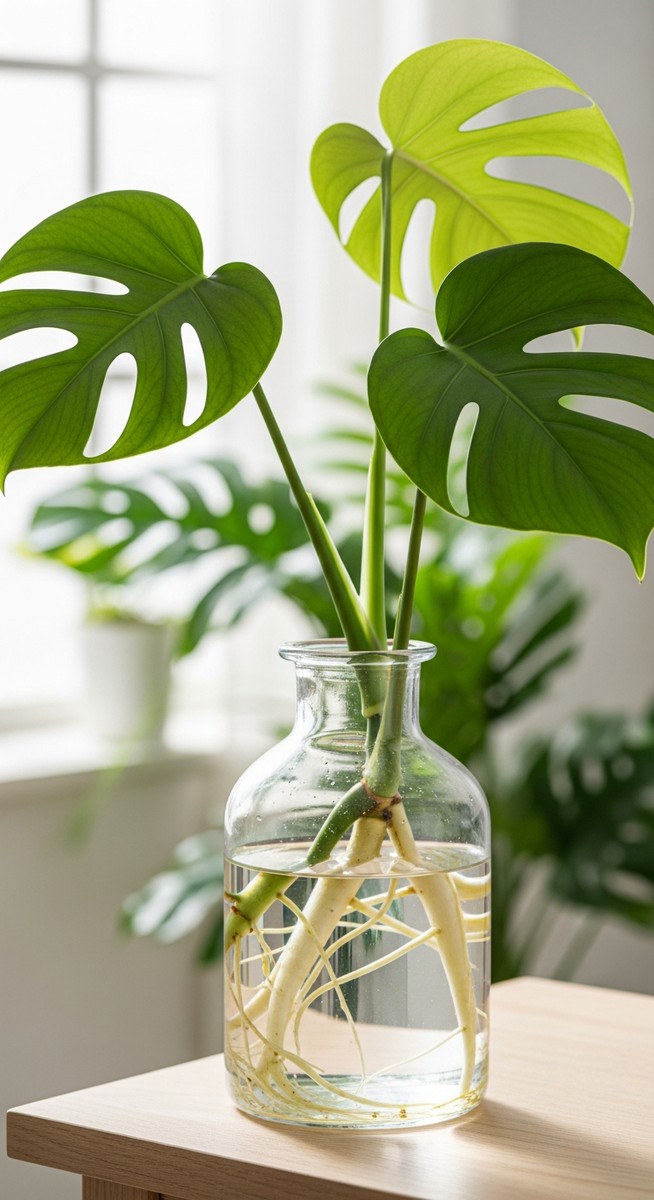
Rooting Monstera cuttings in water is the most common method of propagating Monstera plants and has the advantage of allowing roots to form quickly while also letting you see the full cutting as roots form. However, the roots can be more fragile, making potting the cuttings a bit more challenging, and they may suffer from transplant shock.
Any damage to the more brittle roots can be avoided by simply ensuring that care is taken not to damage the tiny roots when you transplant the cutting to soil. If you do end up dealing with a case of transplant shock, it’s not the end of the world though. Instead, it may simply set the plant growth back by a week or two.
There’s no question that propagating a Monstera in water can look really nice in any room, with plenty of people doing this both as a way to get new plants and to decorate their homes! Also, being able to see the new roots forming is not only interesting, but gives you a chance to assess the health of the cutting.
Just make sure you remember that rooting cuttings in water requires changing the water frequently. You can also take a look at our article on growing Monstera in water to get more tips on how to succeed at this.
How to root Monstera cuttings in soil
Some houseplant enthusiasts prefer to root their Monstera cuttings directly in the soil. Here’s what you need to know to root your Monstera cuttings in soil.
- Take a 4- to 6-inch cutting from a healthy stem of your Monstera plant by cutting it ¼ to ½ inch below a node.
- Remove all but two or three healthy leaves.
- Choose a plant pot big enough to support the size of your cutting.
- Fill the pot with fresh, well-draining potting soil. An aroid mix is an excellent choice although you can find out more about the best soil for Monsteras in our article on this.
- Make a hole in the center of the soil with your finger or a pencil.
- Insert the cutting into the soil so that at least one node is below the surface.
- Firm the soil around the stem to secure the cutting.
- Place the cutting in a location where it receives bright, indirect light. You’ll find that, when it comes to your Monsta’s light needs, they aren’t overly fussy, but best to give them what they want so your cutting really thrives.
- Water the cutting and keep the soil evenly moist until new roots form. Use care that the soil does not remain soggy but avoid letting it dry out. Knowing how often to water your Monstera can be key to its survival.
- Watch for new growth to begin in 4 or 5 weeks.

Miracle-Gro Tropical Potting Mix
⭐⭐⭐⭐⭐
The best soil for Monstera plants, specially made for tropical greenery. Packed with nutrients and lava rock for great drainage, it keeps your Monstera healthy and thriving
Should I propagate Monstera in soil?
You can propagate Monstera in soil as Monstera cuttings root easily in soil and don’t require rooting powder when doing so, although you can use it if you wish as it may speed the rooting process, which takes longer in soil. This also has the advantage of meaning you don’t have to immediately transplant a cutting that’s rooted in soil.
Overall, some do prefer to root their Monstera cutting directly in a pot of soil, with one of the main reasons being that not having to transplant a rooted cutting eliminates issues with transplant shock or stress to new plants. It also eliminates the mess and fuss of dealing with transplanting the cuttings.
When you propagate a Monstera, you can choose to root the cuttings in the desired location for the plant and do not need to worry about changes in the light like you sometimes do when repotting cuttings from rooting them in water. Also, you do not need to constantly change the water, as you do with rooting Monstera cuttings in water.
However, you cannot see the roots when they’re in soil, making it difficult to tell when the plant has developed roots. In addition, roots take longer to form in soil, with it generally taking 4 or 5 weeks for cuttings to root. The soil must be kept moist for the cuttings to root but don’t forget that keeping it too moist poses the risk of rotting the stem and losing the cutting.
Similarly, if the soil dries out too much, the stem and node will wither and will not root. You must monitor the moisture level in the soil carefully when rooting cuttings in soil.
How to root Monstera cuttings in perlite
Rooting your Monstera cuttings in a sterile potting mix like perlite is another option when you are propagating your Monstera plants. This method is similar to rooting cuttings in soil.
- Cut a 4- to 6-inch cutting from your Monstera plant. The cutting should contain at least one node and two to three healthy leaves.
- Fill a plant pot with perlite. The pot should be large enough to support the cutting and not topple from its weight.
- Make a hole in the center of the perlite with your finger or a pencil and insert the cutting so that at least one node is under the surface.
- Water to thoroughly moisten the perlite.
- Place the pot in an area that receives bright indirect light.
- Keep the perlite moist and do not let it dry out.
- Watch for new growth to appear in 4 or 5 weeks. This indicates that roots have formed on your Monstera cutting.
- Repot the cutting in an aroid soil.
Should I root Monstera cuttings in perlite?
Rooting your Monstera cuttings in perlite is always an option. Perlite is sterile and does not promote issues with root rot or other fungal diseases. You do not need to worry about root rot if the perlite is moist, although constant moisture will be a must here. Overall, though, perlite helps grow stronger roots than those rooted in water.
This is because the roots must work their way through and around the perlite. This also means that perlite provides support for the cuttings.
However, keep in mind that, compared to rooting your Monstera cutting in soil, cuttings rooted in perlite must be transplanted into soil as soon as the roots are formed. Unlike water, you won’t be able to immediately see when this happens and this process will also be slower than in water.
How long does Monstera take to propagate?
Monsteras will take up to three weeks to propagate in water and up to five weeks to propagate in soil. Factors that affect how quickly your cuttings root include how much light the cutting receives, the health of the cutting, the time of year and, for cuttings in water, the temperature and aeration of the water.
In fact, a cutting grown in ideal water conditions can actually root in less than two weeks, although putting the cutting in either water or soil will see it grow fairly easily.
However, stem cuttings rooted in soil or perlite typically form roots in 4 to 5 weeks. It’s also difficult to tell when they have rooted. New growth is a sure sign the cuttings have rooted and are taking up moisture and nutrients from the soil, so keep an eye out for changes like this above the soil to avoid unnecessarily digging up your plant to check.
Ultimately, how long it takes your Monstera cuttings to root depends on which method of propagation you use and other environmental conditions.
Can you propagate a Monstera with an aerial root?
You cannot propagate a Monstera with an aerial root as they do not contain any nodes. A node is the bump on a Monstera’s stem that provides new growth so, without that, an aerial root will not grow. However, having an aerial root on your cutting is fine and they can even often form new underground roots.
This can be disappointing for people, especially those who don’t like the look of your Monstera’s aerial roots and think that removing them to propagate a Monstera is an easy solution. You might even think that because aerial roots grow from the nodes on your Monstera plant that you can simply remove the aerial root to propagate your Monstera plant. Unfortunately, this is not the case.
Can you root a Monstera leaf?
You cannot root a Monstera with a single leaf as it will not have any nodes that are required for new growth to form on your plant. A single leaf may form some roots if you put it in a glass of water, but it will not develop into a new Monstera plant.
You can however let the leaf grow in the vase to add a splash of color to your windowsill. This can look incredible for many types of Monstera, especially if you use a giant Monstera leaf to really make a statement.
Similar to aerial roots, you might think that if a leaf grows from a node that you should be able to propagate your Monstera plant by rooting the leaf. But, unfortunately, this is not the case.
Will Monstera grow back after cutting?
Your Monstera will grow back after cutting it. In fact, taking stem cuttings or cutting back your Monstera can be good for the health of the plant. It will likely develop a fuller appearance with more dense foliage along the stem as new leaves sprout and grow.
However, new growth won’t suddenly sprout at the point where you cut the plant, but cutting or pruning can spur new growth from other nodes along the stem.
You can also direct new Monstera growth by cutting the stem above a node that faces in the direction you want new leaves to grow. This forces new leaves to sprout and grow from the node and fill in the area with new foliage.
When should I plant my Monstera cutting?
Monstera cuttings are ready for planting when the first larger roots branch into several smaller, fuzzy feeder roots. You can successfully plant your Monstera cutting when the feeder roots are 3 to 4 inches long.
Look for a cluster of tiny white roots sprouting from the main root to ensure your Monstera cutting has enough roots to support a new plant. Up to one-third of the roots may die off with transplanting.
When should I start fertilizing my new Monstera plant?
Your new Monstera plant needs nutrients to grow, but don’t rush to give it fertilizer right away as this can damage young roots. Instead, wait a month before giving your Monstera plant fertilizer and start out slow.
Mix a balanced houseplant fertilizer to ¼ strength and apply it to moist soil. Avoid fertilizing your newly propagated Monstera plants (or, indeed, any Monstera) when the soil is dry, as this can burn the roots.

Miracle-Gro Water Soluble All Purpose Plant Food
⭐⭐⭐⭐⭐
The best fertilizer for Monstera plants, encouraging bold, healthy leaves and steady growth. An easy-to-use, balanced formula for tropical houseplants.
Fertilize the Monstera plant once a month during the spring and summer when it is actively growing and withhold fertilizer in the fall and winter. Your Monstera plants need to rest after a season of rapid growth.
Will the new Monstera plant have the same fenestrations as the mother plant?
The new Monstera plant will be identical to the mother plant, including that it will have the same type of fenestrations that the mother plant has. However, keep in mind that the new plant will be a juvenile plant and may not show the same lacy patterns until it matures.
Immature leaves are solid green and lack the characteristic fenestrations of the mature plant. The holes and splits develop as the plant matures.
The new propagated Monstera will also be variegated if the mother plant is variegated. Similarly, if the mother plant is solid green, the new plant will have solid green foliage.
When do new Monstera plants develop their holes and splits?
Immature Monstera plants produce solid heart-shaped leaves. The dramatic holes and splits do not develop until the plant matures. Under ideal growing conditions (bright indirect light, high humidity, and well-drained soil), they generally begin to develop their fenestrations in 2 to 3 years.
Your new Monstera plants will look like the mother plant when they mature but may produce immature leaves for the first few years. But don’t give up. With proper care and time, they will develop the striking appearance characteristic of the mother plant.
Likewise, if the plant is a variegated Monstera variety, it may take a while to see signs of the delightful, variegated leaves. Be patient. They will develop in time.
Related: When Do Monstera Leaves Split?
Final thoughts on deciding to propagate Monstera
Propagating your own Monstera plants is an excellent way to expand your Monstera collection and doesn’t cost a thing. Armed with a basic understanding of plant propagation, you can take cuttings from your Monstera plant and root them easily. And don’t overlook the value of propagating your Monstera plants as gifts for family and friends who are sure to appreciate your efforts!
Although here’s something you may not know: Propagating plants can sometimes be illegal, even if they are for your personal use. First, you should be aware that it is illegal to propagate a patented plant. A patented plant must contain identification of the plant identification tag. Look for the patent number or the indication that a patent has been applied for (PPAF) on the plant tag.
However, a Trademarked plant protects the name of the cultivar of the plant only. Therefore, it is legal to propagate a Trademarked plant. Still, according to the Oregon State Extension Office, while you can propagate and sell a trademarked plant, you cannot sell or market the plant using the Trademark holder’s name of the plant cultivar.
That probably won’t apply for anyone looking for how to propagate Monstera so their Swiss Cheese plant collection expands. But it’s something to keep in mind if you start thinking of propagating other plants in your collection!