Thrips are tiny, but they can cause a lot of damage before you even realize they’re there. If your houseplants have weird spots, silvery streaks, or just look off, these pests might be to blame.
And once they show up, they don’t tend to leave quietly.
Getting rid of thrips on your houseplants takes a mix of patience and the right approach. Whether you prefer natural methods or something a bit stronger, there are a few solid ways to kick them out for good.
Table of Contents
Quick Care Guide for Most Common Houseplants 💚
⭐ How to start? Easy, hard-to-kill plants like Monstera or Pothos are usually a great starting point.
💧 Water: Water when the top 1-2 inches of soil are dry, but avoid letting them sit in standing water to prevent root rot.
🌱 Soil: Use a well-draining potting mix designed for indoor plants - I personally use this one. A mix with peat, perlite, or coco coir is great for avoiding soggy roots.
☀️ Light: Most houseplants thrive in bright, indirect light. Too little light can cause leaf drop, while direct sun may scorch the leaves.
🌡️ Temperature: Keep them between 60-75°F (15-24°C) and away from drafts, heaters or air conditioners.
🌿 Fertilizer: Feed with a balanced, water-soluble fertilizer (my top pick is this Miracle-Gro one) once a month during spring and summer. Hold off during fall and winter.
1. Spray neem oil on affected leaves
Neem oil is a natural option to handle creepy-crawly pests on your plants. Mix the oil with water following the label instructions and pour it into a spray bottle for easy application.
Make sure to cover both the tops and bottoms of your plant’s leaves, as thrips like to hide out of sight. You’ll want to repeat this process every few days for a couple of weeks.
Keep your plant away from direct sunlight while it’s still wet to avoid leaf burn. Test on a small area first to make sure your plant isn’t sensitive to neem oil.
2. Use insecticidal soap for thrips control
Insecticidal soap is a common way to deal with thrips on your indoor plants. You can find it at most garden centers. These soaps are designed to target soft-bodied insects.
It’s important to follow the label directions closely. Usually, you’ll spray the affected leaves until they’re covered. Focus on the undersides of leaves, where thrips often hide.
Repeat the spraying every 7 to 10 days as needed. The soap works best on contact and won’t leave a long-lasting residue. For light infestations, a few treatments should make a difference.
Don’t use the soap during the hottest part of the day, since this can cause leaf burn. Always check a small patch before applying it to the whole plant just to be sure there’s no damage.
3. Apply spinosad-based sprays
Spinosad-based sprays are a common choice for managing pests like thrips on indoor plants. These sprays use bacteria-derived ingredients that target certain insects but are generally considered low-risk to people and pets.
Before using, check the label to make sure the product is safe for your plant types. Start by spraying the tops and undersides of the leaves, since thrips hide in hard-to-reach places.
Repeat treatments may be needed as new eggs hatch. Don’t forget to move treated plants away from direct sunlight until they’ve dried, as leaves can be sensitive after spraying.
Consistent use according to label instructions improves your chances of reducing thrips numbers. Avoid spraying more often than recommended to prevent plant damage.
4. Set up yellow sticky traps near plants
Yellow sticky traps are a simple way to catch these pests. You just set them up close to your plants – thrips are attracted to the color and get stuck without any chemicals needed.
Try placing the traps at soil level or hanging them near leaves. Check and change the traps often, especially when you notice them filling up.
You’ll be able to spot thrips activity pretty quickly using this method. Sticky traps also help you track if the problem is getting better or worse over time.
5. Introduce predatory mites
Predatory mites are tiny beneficial bugs that feed on thrips and their eggs. You can buy them online or at some garden shops. Once released, they’ll patrol your plants looking for snacks.
These mites don’t harm your plants and usually aren’t visible unless you look very closely. It’s best to introduce them early when you first notice a problem, so they get a head start.
Lightly misting your plant can help the mites survive and move around more easily. Keep plants away from insecticides while the mites are working, since chemicals might harm them.
6. Regularly prune and remove infested leaves
Grab a clean pair of scissors or pruners and keep an eye out for leaves that look damaged or have visible pests. Snipping off affected areas helps cut down on the number of bugs quickly.
Toss the removed leaves in the trash – don’t compost them – so you won’t risk spreading the issue to other plants. Check your plants every few days, since new problem spots can show up fast.
Pay special attention to the undersides of leaves, since that’s where bugs often hide. Regular pruning doesn’t just help control pests – it also lets your plant put more energy into growing healthy new foliage.
Wash your tools after use to prevent carrying any pests to other plants. It takes a little time, but this routine can make a big difference in keeping your collection healthy.
7. Rinse plants thoroughly with water
Giving your plants a good rinse is a simple way to help remove pests. Use a gentle spray of lukewarm water to cover both the tops and undersides of the leaves.
Pay extra attention to leaf joints, since bugs often hide there. Repeat this process every few days while you’re dealing with an infestation.

Be sure the water pressure isn’t too strong or you might damage the leaves. If your plant’s in a pot, let the extra water drain so roots don’t stay soggy.
8. Use garlic and chili pepper spray
Garlic and chili peppers make a simple homemade spray that can help discourage pests from sticking around. Most people have these ingredients at home, so it’s pretty convenient.
To make the spray, crush a few garlic cloves and a spicy chili pepper, then soak them in water overnight. Strain out the solids and pour the liquid into a spray bottle.
Lightly mist your plant’s leaves, making sure to get the undersides. Test a small patch first to watch for leaf sensitivity.
Reapply every few days, especially after watering or rain. Always wash your hands after handling the spray to avoid eye irritation.
9. Increase humidity around plants
Thrips really don’t like damp conditions. They do much better when the air is dry, so raising the moisture in the air can make it harder for them to hang around.
You can try grouping your plants together to create a more humid area. Placing a tray of water near your plant or even using a small humidifier helps boost moisture around their leaves.
Regular misting with water can make the environment less comfortable for thrips. Just be careful not to overdo it—wet soil for too long might cause other issues.
10. Apply kaolin clay spray
Kaolin clay spray forms a physical barrier that makes it harder for pests to land on and feed from your plants. It’s easy to mix with water and apply using a standard spray bottle.
When you spray it on the leaves, you’ll notice a thin, white coating. This layer won’t harm your plants but discourages unwanted visitors.
Make sure to cover both the upper and lower sides of leaves for best results. Reapply after watering or heavy rain, since the clay can wash off.
You can find kaolin clay in most garden stores or online. Always follow label directions for mixing and using this product safely.
11. Use hydrogen peroxide diluted spray
Hydrogen peroxide can help remove pests from your plants. Mix one part hydrogen peroxide (3% solution) with four parts water in a spray bottle. Give the leaves and stems a light mist, focusing on spots where you’ve seen insects.
Let the plant dry naturally. Make sure you never go overboard – spraying too often could irritate your plant’s leaves. Test on just one leaf first to avoid surprises.
Repeat the process every few days until you see fewer pests. Always keep your spray bottle out of direct sunlight and shake it before each use.
Understanding Thrip Infestations
These pests are tiny but can leave lasting damage on your indoor greenery. Spotting them early is key if you want to limit their impact and keep your plants strong.
How Thrips Damage Houseplants
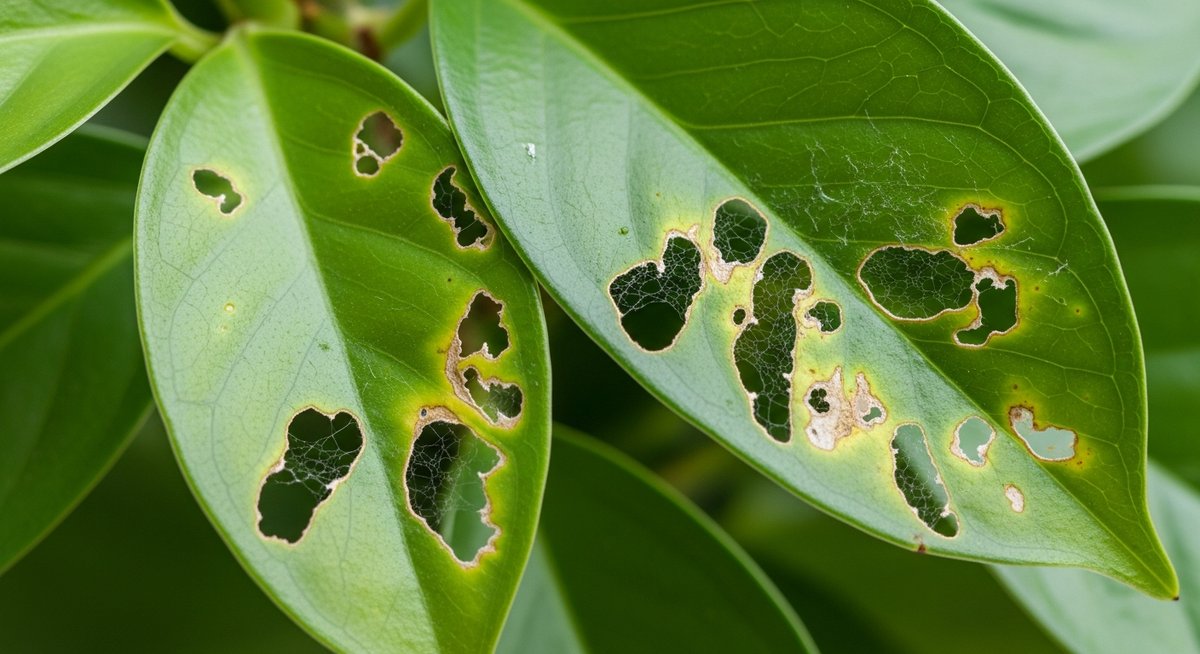
Thrips are small insects that feed by scraping and sucking up plant juices. When they feed, they pierce the surface of leaves, flowers, and stems, causing visible physical harm to plant tissues. Over time, you’ll notice that infested plants develop silvery or bronze patches where the cells have collapsed.
Sometimes thrips also leave black dots, which are their droppings. As they continue to feed, leaves become distorted or curled. New growth may look discolored or stunted.
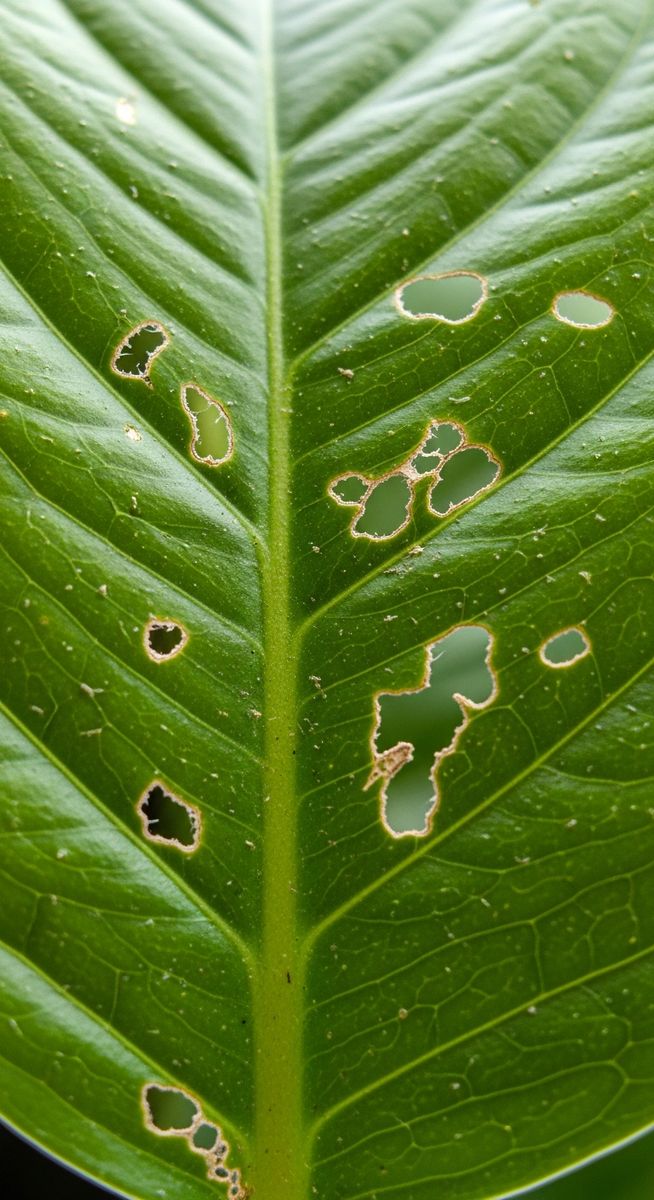
If left unchecked, these pests can reduce flowering and slow down your plant’s growth. Some varieties can even carry diseases from one plant to another. Thrips reproduce quickly, so a small issue can become widespread in just a few weeks.
Signs of a Thrip Problem
Early signs aren’t always obvious because thrips are barely visible without close inspection. You might need a magnifying glass to spot the insects themselves. Start by checking leaf undersides and flower buds, because that’s where thrips usually hide.
Common clues include faded or bleached spots, thin trails, and pinprick scars on leaves or petals. Damaged areas can look like scratches or streaks where the green color has faded. You might feel a slightly rough or raspy texture under your fingers.
If you spot tiny, elongated insects darting quickly when disturbed, you’re probably looking at thrips. Sticky traps placed near your plants can also catch them and confirm their presence. Keeping an eye out for these patterns helps you act before there’s widespread damage.
Preventing Future Thrip Outbreaks
Regular attention and a few changes to your setup can make it much harder for thrips to take hold. Spotting trouble early and controlling the plant environment are key steps in keeping your plants healthy.
Best Practices for Monitoring Houseplants
Check your plants at least once a week, focusing on the undersides of leaves and new growth where pests often gather. Use a magnifying glass or your phone camera to spot tiny moving insects or silver-colored scarring, which can be early signs of a problem.
Place yellow sticky traps near your plants. These traps help catch adult thrips and give you a quick way to see if new pests are showing up. Keep a simple chart to track what you find each week, so you can react quickly if you spot any early warning signs.

When you get new plants, keep them in a different room or area for at least two weeks. This gives you time to watch for any pests before they’re near your other houseplants.
Creating an Unfriendly Environment for Thrips
Thrips thrive in hot, dry places. Raise the humidity by using a room humidifier or by grouping plants close together – both steps make it harder for pests to spread.
Wipe down your plant leaves every couple of weeks with a damp cloth, which helps remove dust and any eggs that may get stuck. Trim off dead or damaged leaves right away because healthy plants are more resistant to pests.
Finally, reduce clutter around your pots and clean up any leaf litter from the soil surface. Thrips can hide in plant debris, so keeping things tidy cuts down on their hiding spots. Always use clean pots and fresh soil when repotting to avoid accidentally bringing in unwanted guests.